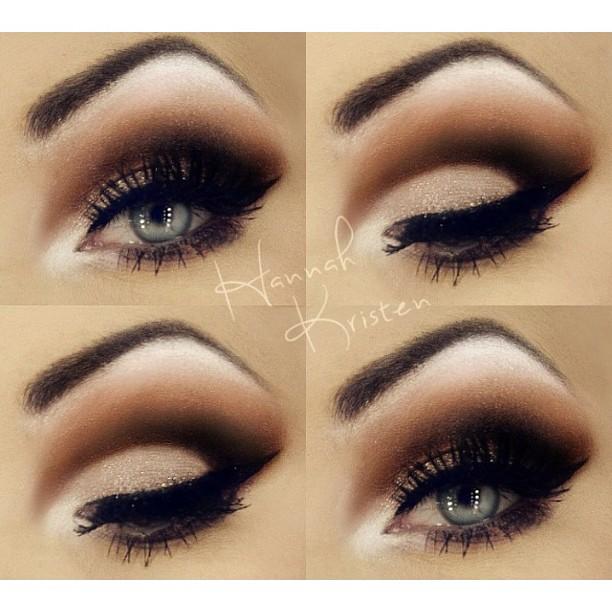
Description

Ok, so not everyone knows how to PROPERLY apply makeup. In fact, I was one of those people who never actually knew how to apply any sort of makeup. I've learned over the years that makeup only makes woman feel and look beautiful and some of us aren't as fortunate as others with having the knowledge to know how. So, that's where I come in. I'm going to teach all you girls out there that are struggling how to put makeup on each step at a time. BUT, make sure you do as I say or else you'll start looking like a zoo animal, and trust me, I've seen it happen.

Monday, October 13, 2014

Smokey Eye


STEP 1
A smoky eye is done with one color of eye shadow. Brown, grey, or black are good choices. Dark plum or navy are for the brave. Eyeliners should match.

STEP 2
Apply a thin layer of foundation across your lids. Better still use a primer or concealer. This will help the makeup stay on longer and appear bolder and more vibrant. Then, sweep on a flesh-colored shadow or powder.

STEP 3
Using your pencil, trace your lash line. Always work from the inside and get thicker towards the end, flicking for a fancy and cat-eye fashion.

STEP 4
Start by sweeping on a layer of shadow close to the lash line with your eye shadow brush, diffusing the eyeliner. Use your lightest color here, a touch of white or pearl shimmer is great.

STEP 5
Trace along your crease and socket then flick out towards the corner of your brow bone with a much darker color, this is a sexy look and gives your eyes heaps of definition and appeal.

STEP 6
Apply a nude shimmering color to your brow bone. By accentuating the highest point on your face you are bringing out your facial features and really complimenting your eyes.

STEP 7
With a soft brush, blend away any harsh lines to make it a more soft 'smokey' effect.

STEP 8
Take a white eye pencil and line your waterline up, this will make your eyes appear wider, brighter and fresher and make you look more awake and healthy.


Eyebrow


STEP 1
First, choose an eyeliner or brow pencil that perfectly, or almost matches your hair color.

STEP 2
Mark the inside edge of your eyebrow. Line up the inside edge of your eye to the outside of your nose. Place a dot on that line; this is where your eyebrow will start.

STEP 3
Hold the pencil on a slant to line up the outside corner of your eye to the outside of your nose. Place a dot on that line on your brow bone. This is where your eyebrow will end.

STEP 4
Mark your arch. Hold the pencil and line up the middle of your pupil with the outside of your nose. Place a dot on that line on your brow bone. This will be the highest part of the arch in your eyebrow.or you can do it straightly

STEP 5
Create an outline. Using the dots, lightly outline the shape that your eyebrow will take.

STEP 6
Fill in the brow. Using tiny, feathery lines, fill in your eyebrows. Using many tiny lines will result in a more natural look if drawing on completely, and give a fuller look if simply darkening or defining brows.


Eyeliner


First we'll start with standing in front of a mirror and tilting your chin up, so that when you look down your nose into the mirror, you can see your entire eyelid. Dab concealer or dust translucent powder on your upper lids. Blend well with a sponge or lightly pat with a fingertip to cover veins and prevent creasing. (So you don't look old)

Before applying your eyeliner, you have to know what sort of eye shape you want. If your eyes are close-set or round, line up only the outer corners. 

Gently pull your eyelid at an upward angle. Beginning at the inner corner, draw small, connected dashes along the top lashes. Be sure to stay close to the roots so there is no skin visible between the lashes and the liner. To make eyes look bigger, extend the liner slightly beyond the outer corners.

Brush a matching powder on top of the liner to keep it from rubbing off. Soften the line with a sponge tip or cotton swab by rubbing it slightly up and out at the corners.


Use a cotton swab to fix mistakes. For larger messes, dip it in makeup remover.


Tuesday, October 7, 2014

Foundation

Before                                                                 After
The Body Shop Moisture Foundation Review Swatches Photos (2)


Putting on foundation for woman is extremely stressful only because there are so many things that could go wrong during the process. The reason woman put foundation on is because, well, for the simple fact that we think our skin isn't good enough to be shown "naked." Putting on foundation can be applied so many different ways, which is why I attached a video down low to show you.

STEP 1
You should always put the foundation on your face and outline all the main parts. ex: cheek bones, forehead, chin, and nose.

STEP 2
Gently smooth the foundation out with a brush, and no not a hair brush, a make up brush.

STEP 3
Apply any powder you have or want to use. This makes the face gain color and this step is used to compliment the foundation.